
RHYTHMIC interactive MIDI loop generator and composer
The intention of "RHYTHMIC" is to provide a simple but flexible tool for generation and handling of rhythm patterns combined with a polyphonic chromatic instrument track.
Preferably it is intended for musical instrument training. A chromatic base line, a chord sequence or a simple melody may be added to the percussion pattern as a simple "rhythm section".
This rough and open concept may be used for for interactive composition too, because every drum beat and note can immediately be changed during playback. Furthermore, the loop length and position may be changed during playback, so it is possible to optimize small phrases interactivley.
Navigation on the sound pattern screen is made with the mouse and is additionally possible with cursor keys. Setting/deleting of events is made with the mouse buttons or with the keys 'V', 'D' and 'X' (details see below). This way the complete event handling is possible with the keyboard too. In some situations this works faster and more precise than clicking by mouse.
Drum beats and chromatic notes may be entered interactively via MIDI IN - by a keyboard or MIDI drumset for example.
Any number of loops may be joined together in an ASCII text file. An interpreter is implemented to playback the list as a complete song or store it as MIDI File.
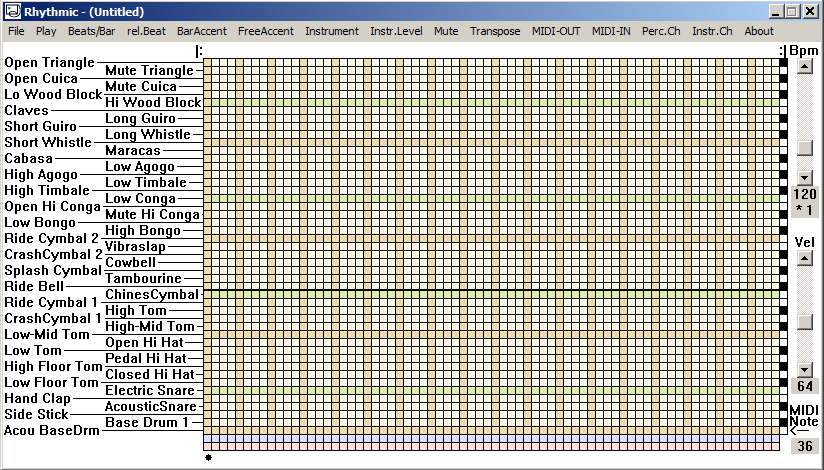
There is a significant difference between conventional musical notation using five lines and the concept introduced here. Regardless of the tune key, all notes are entered here in "intervals". Every horizontal row represents a specific semitone. Every light brown row stands for an octave, every light green row stands for the 4th interval of the octave.
It is structured a little bit like an electric piano player roll or a punchcard.
When the tune gets transposed, simply the symbolic keyboard display at the right (and left) side of the pattern area is shifted up or down. The display of the musical pattern is kept constant. For special pitch modification, all notes in a bar can be shifted by semitones while the tune remains unchanged.
The software is available be downloaded for free, see bottom of this page
This software was derived over a period of time from the "DRUMS" example presented in "Programming Windows -5th ed." by Charles Petzold. The internal structure of the program was modified almost completely and many features were added.
For best fitness to different kinds of PC display, versions with a different number of max. number of beats per loop are provided:
- RHYTHMIC72 offers max. 72 beats per loop and is optimized for netbooks with a small display. The window size is 824*480 pixel at 96 dpi (100%) system font size. With some Windows screen designs this tiny version does not work properly (menu bar too long). But at 120 dpi (125%) system font size it works well and it takes 1030*600 pixels - does exactly fit into my 1024*600 netbook, however.
- RYHTHMIC96 is ok for displays with min. 1024 horizontal pixels. At 120 dpi system font size it does fit well into a display with 1280 horizontal pixels.
- RYHTHMIC128 is useable for displays with 1280 or 1366 horizontal pixels at 96 dpi (100%) system font size.
- RYHTHMIC144 designed for HD screens with 1600 and more horizontal pixels. Else all versions have the same features.
To get started, first you should decide, which measure and time structure you want to start with. Select with menue "Beats/Bar ".
Every column in the main screen represents one beat within this structure, a kind of timeline. The first beat of every bar is marked with a light brown vertical column. To get more resolution and/or special accents, a musical bar may be extended over several software defined bars. For this reason, bars with 12,16 and 24 beats are provided, to handle 1/16 notes for example. For improved orientation, certain colums are coloured light grey. But only the light brown coloured first beats per bar put an accent to the sound.
After the mouse is positioned over a raster point or it is addressed by cursor keys with the left mouse button beats of percussion instruments are inserted into the pattern. Alternatively you can set a percussion instrument by pressing key 'D' (case independent). Attention: to use keys D,V and X, first you have to mark a raster point by mouse click or by cursor key. They do not react immediately on mouse position.
The kind of percussion instrument is selected by the vertical position according to the instrument list at the left side of the display. The transmitted Note On message corresponds with the "General MIDI" standard. Any number of percussion instruments can be selected to be triggered per beat. A selected percussion instrument is marked with a magenta raster dot. If a selected instrument is hit again by the left mouse button or key'D', it gets removed. As percussion patterns most times are repeated per bar, most times it is only necessary to enter the percussion section for one bar. This can be copied to other bars and later be modified individually. For details see below.
Alternatively or additionally, with the right mouse button (or key 'V' - case independent) touches for the chromatic instrument are set (piano by default).
At both sides of the window (RHYTHMIC72 only at the right border), a symbolic piano keyboard is displayed - the left part of a real piano keyboard is positioned towards the bottom of the window. Chromatic instrument touches are marked greenish cyan.. Any number of notes (chords) may be set per beat, possibly limited by polyphony of your MIDI synthesizer.
If percussion and chromatic instruments are overlayed at a raster point, the corresponding color changes to black. All events from a raster point are cleared with the middle mouse button or key 'X' (case independent). At the actual "cursor" position, the respective colors - as describe above - are highlighted. If no event is activated under the "cursor" position, this raster point is marked solid blue.
It is possible to enter drum beats and chromatic notes interactively via MIDI IN - by a keyboard or MIDI drumset for example. The MIDI IN port is selected by menue, details see below. MIDI IN and MIDI OUT always use the same MIDI channel, one for chromatic notes, another one for the drumset. When a MIDI Note On message is received at the selected MIDI IN port, the sound is immediately (asynchronously) retransmitted at MIDI OUT for acoustic feedback, but the stored value gets quantized according to the rastered timing.
Exclusively Note On messages at the selected MIDI channel with nonzero velocity are evaluated. Note Off messages, Control Change, SysEx etc. are ignored. The end of a note is determined by the actual note pattern of the loop. The note velocity is not registered, during playback it is defined by the parameters selected by menue and slide bar. Every note value gets registered at its orginal MIDI pitch. Note values out of the pitch range given by the raster are discarded. Special pitch shifts as described below are not handled during recording via MIDI IN, but when the registered notes are played back later.
If a typical base instrument is selected by the "Instrument" menue, all notes are played one octave lower automatically.
Some horizontal rows are colored light brown. These mark the octaves of chromatic instruments in relationship with the selected key tune (default C). Other rows are colored light greenish. These mark the 4ths intervals for chromatic insturments. Will be helpful for insertion of notes.
The MIDI note value of the lowest octave line is inserted as number at the right bottom of the screen.
The lowest two rows have special functions:
The light bluish row is used to mute chromatic instruments and to add velocity "free accents". If a field is marked with the right mouse button, all pending notes are muted (stopped) immediately at the beginning of this beat. Else any note is not muted before another touch is performed with the same note value. If marked with the left mouse button, velocity may be increased or lowered for this beat corresponding to the selection of the "FreeAccent" menue. More details see below at the description of the "FreeAccent" menue.
The light red row is used to punctually increase the note range: If marked by the right mouse button, every note above the thick black line is shifted up by one octave. If marked by the left mouse button, every note below the thick black line is shifted down by one octave (acoustically, not visually).
To get RHYTHMIC playing back, the MIDI interface has to be selected by the "MIDI-OUT" menue.
A basic choice is "Microsoft GS Wavetable Synth", which is the default setting. Depending on your sound system, a better sound generator may be selected. Furthermore the MIDI channels for percussion (usually channel 10) and chromatic instruments have to be selected.
Playback is started with item "Loop File" of the "Play" menue and stopped with item "Stop". Alternatively it stops at the end of the current loop with the menu item "Stop at Loop End". Stopped loops can be restarted from the current beat with "Continue" or restarted from the beginning with "Loop File". During playback, the acutally played beat is monitored by a black dot running at the bottom of the window. Percussion beats and note touches may be modified arbitrarily during playback.
At the top of the window (below the menue bar) there is a sign |: which marks the beginning of the actually played loop. It can be positioned with a left mouse click into this upper display area. Correspondingly the end of the loop is marked with :| which may be repositioned by a right mouse button click into the uppermost display area. The loop is performed within the |: :| marked range. The colums where |: and :| are placed, are not part of the loop.
At the right edge of the display two scrollbars are installed
--- to set the playback speed ("Bpm") between 40 BpM (bottom)
and 506 BpM (top). This very high top value may be useful the create short but complex sound patterns
--- and the loudness ("Vel") of the output (= MIDI velocity, not a volume control of the loudspeaker).
At the right bottom corner the MIDI note is displayed, which is the base note of the lowest octave. May be overridden in selected colums by entry to the lowest light red row.
After the features are introduced in general, the menue options are explained step by step:
File menue items:
- New (Ctrl+N) - the screen is cleared. Default at program start.
- Load / Play / Edit - opens a dialog to select an existing Rhythm file (ending .RYT) for playback and modification.
With this menue item, the actually selected MIDI environment (ports and channels) is not changed, even when the file was saved in a different MIDI environment. This is the menue option, you will normally use during a session. - Load File incl. MIDI Port+Ch. - opens a dialog to select an existing Rhythm file (ending .RYT) for playback and modification.
The actually selected MIDI environment (ports and channels) is saved together with every Rhythm file. This menue item will set the MIDI environment to the values which are stored in the file. Usually this makes sense when a session is opened and you load the first file . - Save File (Ctrl+S) - saves the actual screen under the same file name as it was opened. A backup of the original file is saved automatically (ending .BAK).
- Save File As - opens a dialog how to save the actual screen.
- Save File as MIDI File(GM) - the actual screen content is converted into a GM compatible MIDI file (format0). This kind of file can be played back with Windows Media Player or similar software independently of the Rhythmic program. When Line Out of the sound card is connected to Line In, the soundtrack can be recorded as .WAV or .MP3 file to be used with a looper for example.
- Save File as MIDI File(format1) - the actual screen content is converted into a format1 MIDI file. This kind of file is useful to be imported into a Digital Audio Workstation, like Ableton. The percussion track and the chromatic instrument track will be available there as independent MIDI tracks, but can be played synchroneously.
- Open PlayList - any number of .RYT files may be concatenated to a play list using an external ASCII text editor (like Windows Editor). This way different parts of a song may be created separately and be used multiply within the song.
The file names are separated in the list as follows: write each file name in a new line or separate them by a comma within a line.
At the end of any line, a comment may be added. It has to be separated from the "musical content" by a semicolon. By the way, the semicolon may be used to "comment out" parts of the list and to add them at later time without the need to type it all again.
Leading spaces, tabs and empty lines are ignored. If the file name entry in the list does not contain a dot, the ending .RYT is added automatically to the file name. The list has to be saved as a raw .TXT file without word-processor specific format information.
Some playback parameters are taken exclusively from the first file of the song and will be valid for the complete song. These are: playback tempo (BpM), transpose key (i.e. all partial files are automatically transposed to the key of the first file), MIDI Port and MIDI channels for percussion and chromatic instrument. It might be a good idea to create a set of starter files for specific kinds of songs.
All menue selectable file parameters else are played back as recorded. This provides some possibilities of sound modulation. - Save List as MIDI File(GM) - this way the complete song is converted into a GM compatible MIDI file (format0).
- Save List as MIDI File(format1) - this way the complete song is converted into a DAW compatible MIDI file containing 2 synchronous tracks (format1).
- Quit (Ctrl+Q) - quits the program immediately. If file contents are changed, a corresponding message box appears.
- Play All (Ctrl+A) - plays the complete list of .RYT files from beginning to the end.
- Play from File (Ctrl+F) - plays the loaded list from the actually displayed partial file.
- Loop File (Ctrl+L) - loops the actually displayed file permanently.
- Loop File / MIDI IN undo (Ctrl+U) - same as Loop File, but when a note from MIDI IN corresponds with a note event already set on the screen, this event gets deleted. This way you can "play notes away". With every playback option else, a MIDI input on an existing note event will change nothing.
- Stop (Ctrl+S) - stops any playback immediately, sends "All Notes Off" and closes MIDI.
- Stop at Loop End (Ctrl+E) (new Jan'17) - stops any playback at the end of the currently played loop, sends "All Notes Off" and closes MIDI.
This mode simplifies precise editing when played and recorded as sound file for .WAV file loopers etc. - Continue (Ctrl+K) (new Jan'17) - restarts playback from the point where it was stopped.
MIDI gets initialized again, causes some garbage - but harmless - MIDI output.
If this command is given, while a file is playing, it has no effect.
- selects the number of beats per bar.
The beginning of every bar is marked by a vertical column in the main screen. With the "Accent" menue an increased velocity may be activated at the first beat of the bar. Sometime it makes sense to use a bigger number of beats per bar than effectively played back to increase the resolution of percussion and notes. For triole style music for example, 12 beats per bar is useful. By means of the "rel.Beat" menue, the effective playback speed may be set *3, which leads to normal BpM at playback. This way triole style and 4/4 style parts may be easily put together in a song.
- multiplies the Bpm setting (as selected with the vertical scroll bar) by the given factor.
This may be useful to put files with different measures together in a list. When a list is played, the Bpm setting is only taken from the first file of the list. So the rel.Beat factor may be used to modify the effective playback speed of some partial files. During playback, the Bpm may be changed globally for the complete song at any time.
- This way the MIDI velocity of percussion and chromatic instrument is increased by the selected amount at the first beat of every bar.
These velocity accents are added to the basic velocity (as set with the vertical scroll bar at the right side of the window).
Note that the resulting MIDI velocity cannot be greater than 127. So, if a high basic velocity is set by the scroll bar, the accented velocity may become saturated. On the other hand: at low basic velocity, the accent has a greater audible effect.
- This way the MIDI velocity of percussion and chromatic instrument is increased or even decreased punctually by a right mouse click into the bluish bottom row.
These velocity accents are added to the basic velocity plus "bar accents".
Note that the resulting MIDI velocity cannot be greater than 127 or lower than 0. So, if a high basic velocity is set by the horizontal scroll bar, the accented velocity may become saturated. On the other hand: at low basic velocity, the accent has a greater audible effect.
- Primarily some preferred GM instruments can be selected directly.
By default, a Honky-Tonk Piano is selected. The selection of these instruments was made with some preference to percussion-oriented instruments.
Additionally, any kind of GM instrument can be selected by the "Others" item. Note: In literature exist different tables with the instrument numbers differing by one. For reference: Acoustic Grand Piano has to be entered as GM instrument no. 1, NOT as 0.
- The MIDI velocity of chromatic instruments may be raised or lowered in relationship with percussion velocity.
Note that the resulting MIDI velocity cannot be greater than 127. So, if a high basic velocity is set by the horizontal scroll bar, increased velocity may become saturated. If a negative velocity would result from the selection, it is clipped to zero.
Attention - this menue has different effects: when a single .RYT file is composed or edited, the setting of this parameter is stored into the file and will become effective during playback as a single file or as a part of a file list. This may be useful to modulate the instrument parts within a song.
In the list playback mode however (some menues are shaded grey) this menue globally modifies the velocity relationship between percussion and chromatic instrument, but will not be saved. This may be useful for some training situations.
- For musical trainig sometimes it is useful to mute the playback sound periodically for some beats.
- changes the key (tune) of the file or playlist.
Internally this is performed by simple incement or decrement of MIDI note values when they are transmitted to MIDI OUT. Visually, only the keyboard structure at the right side of the window is shifted. In contrast to conventional notation, intervals are visually kept constant in their semitone coordination. The memory content of chromatic notes is not modified by this operation, only the interpretation.
- selects the MIDI port, where the stream of MIDI data is sent to during playback. If no MIDI OUT port is available at the computer, the "Rhythmic" program does not make sense and it ends with a message box.
By default the the "Microsoft GS Wavetable Synth" is selected when the program is started. Depending on your sound system, there may be a better sound generator available. It is not possible to send percussion and chromatic instrument data to different MIDI ports, but on different MIDI chanels of the selected port.
ATTENTION: avoid to select MIDI IN and MIDI OUT in a way that the MIDI signal flow is short-circuited! This will cause a program crash due to "Stack Overflow". For example: never select "Maple Midi Out: Port1" and "Maple Midi In: Port1" at the same time.
- selects the MIDI port for interactive recording.
If no MIDI IN port is available at the computer, a message box appears and the menu item is grayed out. Be aware that this case may happen, when all installed MIDI ports are occupied by other applications.
Because the selected MIDI port is stored in .ryt files, the actual file format is longer than old versions (before 2016). But Rhythm files produced with old program versions still can be loaded. By default the uppermost MIDI IN port from the menue list is selected.
- selects the same MIDI channel for MIDI IN and MIDI OUT, where percussion data are sent to.
In most cases, MIDI channel 10 is the correct setting.
- selects the same MIDI channel for MIDI IN and MIDI OUT, where chromatic instrument data are sent to.
Additional features handled by computer keyboard:
Some keyboard related features are performed directly, i.e. no mouse click is necessary for this step:
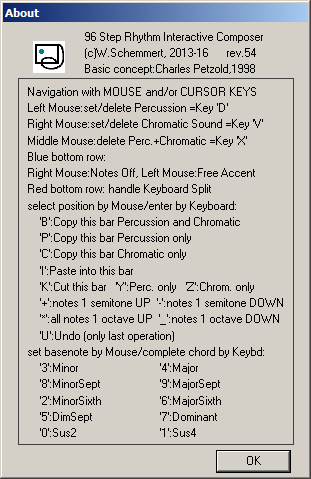
- L - shift/rotate the complete content between the markers |: and :| by one column left.
This may be useful to experiment with shifting accents. No mouse click is necessary for this step - R - shift/rotate the complete content between the markers |: and :| by one column right. No mouse click is necessary for this step
For any cut, paste, copy operation click somewhere into the BAR which shall be handled and type the corresponding command letter (case independent, only for clearity written in capitals here):
- B - copy BOTH percussion and chromatic instrument data of this bar into intermediate memory
- P - copy ONLY percussion data of this bar into intermediate memory
- C - copy ONLY chromatic instrument data of this bar into intermediate memory
- K - cut BOTH percussion and chromatic instrument data of this bar. Gets stored in intermediate memory, too. Previous content is temporarily saved for undo
- Y - cut ONLY percussion data of this bar. Gets stored in intermediate memory, too. Previous content is temporarily saved for undo
- Z - cut ONLY chromatic instrument data of this bar. Gets stored in intermediate memory, too. Previous content is temporarily saved for undo.
- i - paste intermediate memory into this bar. Previous content will be overwritten but temporarily saved for undo (one step only!).
- U - undo last operation. Only one undo step for the last operation is available ! No mouse click is necessary for this step
- +(plus) - shift all chromatic notes in this bar by one semitone UP
- *(star) - shift all chromatic notes in this bar by one octave UP
- -(minus) - shift all chromatic notes in this bar by one semitone DOWN.
- _(underscore) - shift all chromatic notes in this bar by one octave DOWN.
- 0 - add sus2 triad
- 1 - add sus4 triad
- 2 - add minor sixth chord
- 3 - add minor triad
- 4 - add major triad
- 5 - add dim sept chord
- 6 - add major sixth chord
- 7 - add dominant sept chord
- 8 - add minor sept chord
- 9 - add major sept chord
- U - undo last operation. Only one undo step for the last operation is available ! No mouse click is necessary for this step
The subsequently downloadable material is copyrighted (c)2013-17 by Wolfgang Schemmert
Download "rhythmic.zip" File
---rev.53 (10 January 2016):
* State of information January 2017.
Use of the software is permitted for free by everybody for any purpose ("freeware")
Provided 'as is' - without any warranty. Any responsibility is excluded.
Contains this page in PDF format and .exe files of RHYTHMIC72, ~96, ~128, ~144.
Minor bugs concerning MIDI port selection fixed
---rev.54 (23 January 2016):
Bug concerning playback of files created with old version (without MIDI IN) fixed
---rev.55 (20 March 2016)
Navigation by cursor keys, commands D,V,X,*,_ added
---rev.56 (02 January 2017):
Menue items "Stop at Loop End" and "Continue" added. Minor improvement of screen design
"Microsoft GS Wavetable Synth" is default MIDI OUT device
For features, which can be operated without mouse, keyboard shortcuts are added
* Right of technical modifications reserved. Provided 'as is' - without any warranty. Any responsibility is excluded.
* This description is for information only, without any warranty. No product specifications are assured in juridical sense.
* Trademarks and product names cited in this text are property of their respective owners.